One of the most anticipated features of Windows 7 is its native Virtual Hard Disk (VHD) features, the format that is used in Virtual PC and similar virtualization platforms.
Windows 7′s VHD support will give users the ability to install any operating system that supports booting from a VHD into a VHD. For example, a user could have Vista installed on a single partition, and then have three files (VHDs) anywhere on that disk (or for that matter, on any partition that is readable by Windows) and be able to boot different versions of Windows 7. Assuming that SP1 and SP2 were released (which they are not yet available), a user could hypothetically have four operating systems on a single partition (the number is only limited by the bootloader, four is actually just a random number selected), like so:
- Vista installed on a primary partition (such as “C:”).
- Windows 7 RTM installed within a VHD (such as “C:Windows7.vhd”).
- Windows 7 SP1 installed within another VHD (such as “C:Windows7SP1.vhd”).
- Windows 7 SP2 installed within yet another VHD (such as “C:Windows7SP2.vhd”).
Of course, the number of VHDs is virtually unlimited, but it’s quite easy to see the hype associated with VHDs in Windows 7. Now, as for creating a VHD in Windows 7:
How to Create and Manage a VHD in Windows 7
1. Go to the Start Menu (or Desktop) and right click “My Computer” and click “Manage.” This is the easiest way to access Computer Management, but it can also be accessed via the Administrative Tools as “Computer Management.”
2. Now click on “Disk Management” under “Storage” in the sidebar. This will present you with a list of partitions on your computer. Now, to create a VHD, you can either right click “Disk Management” and click “Create VHD” or you can go to “Actions > Create VHD.”
3. This should cause a new window to appear, titled “Create and Attach Virtual Hard Disk.” Now, specify where you would like your .VHD stored (you can type the location or use the “Browse” function shown.” Then select a size (remember that you can choose between MB (Megabytes), GB (Gigabytes), or TB (Terabytes). Now, here comes an important option that is entirely down to user choice.
Selecting the Dynamically Expanding format means that as the files within the VHD increase in size, so will the VHD in question. Unfortunately, this format is a little slower than a Fixed Size format, which allocates all space selected immediately (meaning that even if the files inside the VHD measure, for example, 200MB, the disk will still be 600MB (assuming that you selected 600MB for the size of the disk)). However, a Dynamically Expanding disk can be quite useful for those hurting for disk space; even so, it’s entirely your choice, either format will do. Just make sure that the size of the disk is large enough to handle whatever you plan on placing inside of it. When you’re done, click “OK.”
On a writer’s note, I personally prefer Fixed Size disks.
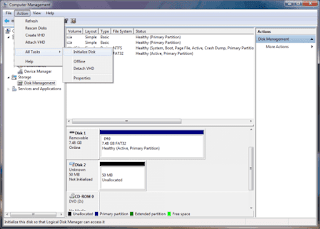
4. Now, we need to initialize the disk so that Windows can access it. To do so, scroll down (if needed) inside of the detailed partition map at the bottom of Disk Management and find the disk that you just created (percentage bar should be black inside of blue). Now, click the button where it says Disk 2, Unknown (yes, it’s actually a button). You can then either right click the button and select “Initialize Disk” or go to “Action > All Tasks > Initialize Disk.”
5. This should bring up a new window titled “Initialize Disk.” Make sure that your new disk is checked and select “MBR” (I do not suggest selecting GPT unless you know why you need it). Afterwards, click “OK.” This will initialize the disk and allow you to create your first partition on the disk. To do so, either right click the “Unallocated” box and select “New Simple Volume” or go to “Action > All Tasks > New Simple Volume.”
6. This will present us with a new window titled “New Simple Volume Wizard.” Click “Next.” Unless you want to create two partitions on this disk, simply click “Next” again (if you would like to create two partitions, then make sure that you edit the simple volume size to leave some free space on the disk; however, most users will not need this option). If you would like to mount the disk with the new partition as a separate volume (allowing you to access it in Explorer with a different drive letter), then simply click “Next.” However, if you would prefer to have the disk mounted as a folder (for example, the root of the disk would be located at something like “C:tmp”), then select “Mount in the following empty NTFS folder” and either type the location of the folder or click “Browse,” select the folder, and click “Next.” If you don’t want to access the partition whatsoever yet, then select the third choice and click “Next.” Now, unless you know what you are doing, simply select a Volume Label and click “Next.” You can now review your choices (and optionally go back and change anything); afterwards, click “Finish.”
7. Your new VHD should now be accessible.
This was originally going to be a full guide on VHDs for Windows 7; however, I have decided to split it into several parts (I will eventually cover how to install Windows 7 into the VHD, how to attach and remove the VHD, and how to add the VHD to the bootloader in Vista, as described in the beginning of this document) as it has become way too long to add anything else (1001 words). So keep an eye out for my next article.


No comments:
Post a Comment