Tuesday, December 27, 2011

5 Things Every Beginner Hacker Should Know

This post is for everyone out there who actually want to become a true & good Hacker.


1. Never trust sites that ask you for money in return of Hacking Softwares or who claim to Hack Email Id’s in return of money. All such things are Scam. Nothing Works.

2. There is no direct software or tool to Hack Facebook, Google, Yahoo or any other big website. All the softwares that claim to do so are scam. They are just meant to take your money and in worse cases, those softwares have trojans or keyloggers in them. As a result your account gets hacked trying to hack others.

3. Never ever use the keyloggers or trojans you find as freeware on internet. Hackers are not fools. They compile keyloggers and trojans almost with any such software and when you install them, you are already hacked before even trying to hack others.

4. You are never going to be a good hacker without the knowledge of programming and scripting languages. When you are going to use only ready made softwares and would depend on them for hacking anything then your functionality would be limited upto the functionality of the software. When you are not going to use your brain , just doing the copy paste thing, then how can you even think of being a good hacker.

5. If you are a good Hacker, you already become a good programmer , a good script writer , a good web developer and an excellent security expert. Well any good Hacker have good knowledge of various aspects and programming languages, XSS (Cross Site Scripting ) , PHP Injection , SQL Injection , Phishing , Footprinting etc. You will have to be good at programing and scripting. And when you know the Various loop holes, vulnerabilities and security tips, you already become a Computer Security Expert.

So Never Ever Under estimate the term Hacker. A Hacker Is Not a person who just hacks email id’s or servers but a True Hacker is a Computer Genius who have the knowledge of computers more than anyone.

Tuesday, December 20, 2011

Hack Computer With Ardamax Keylogger v3.8.9


Hello, today we are going learn that how to hack any Computer with Ardamax Keylogger v3.8.9? I said hack any Computer it means we can get screenshots, webcam images, chat logs, web logs etc so it is not only hacking email accounts but also getting information about your victim's activities. So for this definitely we need Ardamax Keylogger, first Download it.

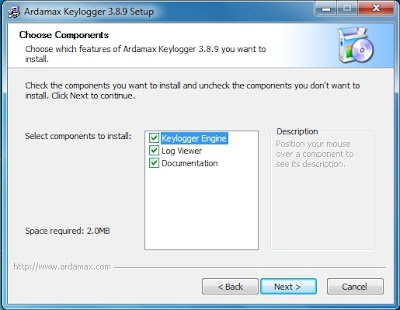
1. Now after download it's time to install it, open "Ardamax Keylogger v3.8.9.exe" from the downloaded file. Click "I Agree" button.


2. After clicking "I Agree" button, click "Next" button.


3. Then click on "Install" button.


4. Then installation will start after clicking "Next" button in the previous step after automatic installation just uncheck one box and click "Finish" as shown in picture.


5. After installation you'll see a new icon in the taskbar just like a notepad and pen. So now we'll setup this keylogger with some manual settings. Right click on that icon and click on "Remote Installation..." And you can also see another option "Enter registration key..." click on it to make it register to work properly, use this info to register:

Name: Popescu Marian
Serial: 083A-E649-5E15


6. A window will appear just click on "Next" then you'll see a window with some options leave default just take a look at check box with option of appending means if you want to merge with or bind this keylogger virus (trojan) with any file like document, picture or even video file then you have to check the box and click Browse button to browse your requested file, we are not appending in the tutorial but it is up to you.


7. Leave all option default these are perfect options that we can use and click on "Next >" button.


8. Then you'll see window where you can setup a password for this trojan or virus, again it is up to you not really needed but good to have. If you want to setup a password then click on "Enable" button and follow steps and click on "Next >" button.


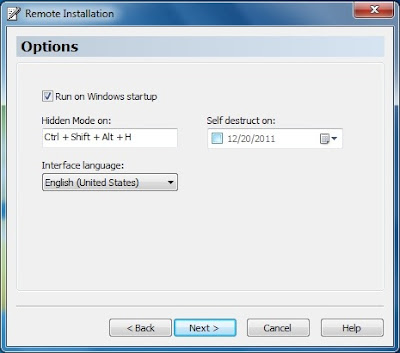
9. After that you can set combination of keys for your trojan it is recommended to change it because "Ctrl + Shift + Alt + H" are default combination of keys and don't check the box about "Self  Destruct Date" if you want to receive logs from your victims for unknown time or infinite time. Then click "Next >"


10. Then a new window will appear check the box "Send logs every" and set the time about getting logs, delivery method i prefer "Email" & "FTP" in this tutorial i'm using "Email" it works, set the log format to "HTML (web page)", and then check what you want to receive to your email or ftp account like screenshots, keystroke logs, chat logs etc. Next option is up to you that you can set the limit of data size to get logs but i recommend to uncheck this and then click "Next >" button.


11. Then you have to put your email account information just follow the picture remember to click on "Test" button to see it is working or not if you get error about connection refusing to something like that then just click on arrow button next to "Security" and select "None" instead of "SSL". When you type of email address it will automatically insert all other fields except password field.


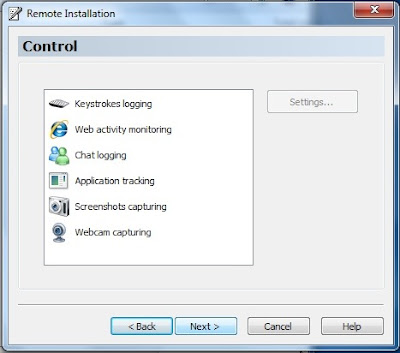
12. Just leave all settings as default but if you want to edit then select anything that you wan to set and click on "Settings..." and after setting just click "OK" button and then click "Next >" button.


13. Now it will ask you about screenshots settings just click "Next >" or if you want to set it manually then do it what are you waiting for, then click "Next >" button.


14. Then again it will ask about images taken from webcam just leave it default or set it as you want then click "Next >" button.


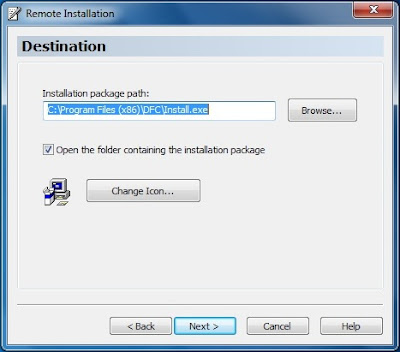
15. Then it will ask you about destination where you want to save it in your PC and you can also change default icon just click on "Change icon..." button and select any icon and click "OK" button then click "Next >" button.


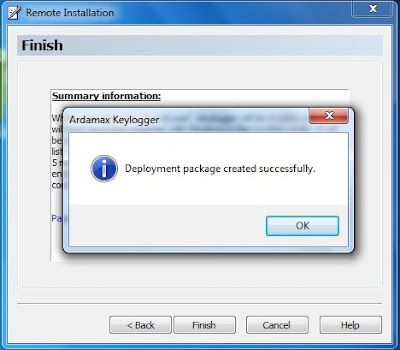
16. At last just click on "Finish" button and then a pop-up will appear as show in picture just click "OK". And it will open the folder where you saved your trojan or virus just send that virus to any victim and start receiving keystroke logs, chat logs, screenshots, webcam images etc to your email which is used in making virus or trojan.


Still you have any question or trouble about this tutorial then reply to this post.

Sunday, December 11, 2011

Trick On How To Convert Mozilla Firefox v3 Into Keylogger


Do you want create your own working undectable keylogger and without any programming knowledge. The keylogger can store all the usernames and passwords of mozilla firefox without the user’s consent.

How this Keylogger Works?

Whenever you login into any website using mozilla firefox browser it always ask’s you whether you want to save password or not for that website.

We will be using a script that will not give the user option to save the password instead it will automatically save the passwords without user’s consent and we will retrieve them later.

Can this be detected by antivirus?

I have scanned it with Mcafee, Norton and Avast and it is totally undetectable.

Does It work on all websites?

It is working on almost all websites like Facebook, Hotmail, Yahoomail, MySpace, Digg, Etc. But this trick somehow failed on Gmail.

Now I will give you the step by step tutorial on how to use this trick.

1. Download this script here and now go to the following address. If you are Windows user then goto C:/Program Files/Mozilla Firefox/Components If you are MAC user then goto Applications >Right click Firefox >Show Package Contents >Contents/MacOS/Components

2. Now find a file nsLoginManagerPrompter.js and copy it to somewhere safe location because we will be replacing this file in next step.

3. Extract the script folder that you have downloaded in first step and copy and paste the nsLoginManagerPrompter.js from the folder to the folder mentioned in step 1. So now your firefox keylogger is ready. Now Each and every username and password will be automatically saved.

How to retrieve Username & Passwords?

Go to Tools > Options > Security > Saved Passwords ...


Then you will see the list with Username & Passwords ... Enjoy Hacking :)

Easy Steps To Direct Download Any Torrent File With IDM


1. First of all, If  you have no IDM installed on your PC you have to download IDM and install it, then download the torrent file (.torrent) which you want to download.

2. After that just go to the website http://www.torcache.net and click Browse to upload the torrent file that you have just downloaded and click on the Cache! button.

3. This will give you a new torrent file. You just have to copy the link of the new torrent file from the opened window.

4. Then go to the website http://www.torrific.com and create an account there (in case you don’t have) and login to your account. Then paste the address of the new torrent obtained in step 3 and click on
"Get" button.

5. Now you will get the list of available files present in that torrent file. Then click on the initiate bittorrent transmission button. This will give the full option to download the file. Just click on any link and you can see the download manager-IDM popping out for downloading the file. Now enjoy the ultimate Speed of IDM for downloading torrents too…

Cheers :)

Tuesday, December 06, 2011

How To Create Your Own Network Cable

Introduction

Hi, I want to show you how easy it is to create your own network cable with just some tools you can easily get from the local computer store.
Below is the tools you're going to need to crimp your own network cables.

 Tools for creating network cable

Step 1

First slide in the boots to the cable, you only need the boots if you want to make your cables look more professional, you can skip using these if you want.


Step 2

Strip the cable jacket using the cable stripper, then untwist the cables and arrange them according to the color codes that I'll show you below.


Color Codes

Here are the color codes I was talking about, you can see there are two color codes, the first is the T568A and T568B.
Rule of thumb if you want to connect same devices such as switch to switch, router to router, PC to PC, and PC to router, you should use different color codes at each end. For example you should use one end with T568A and the other end with T568B. This is called the crossover cable.
If you want to connect different devices such as router to switch, switch to PC you should both end with the same color codes. This is called the straight-through cable.

Personally I like to use the T568B color codes for both ends.

T568A 

 T568B 

Step 3

Cut the cables so it conform to the length of the RJ45 jack, then slide in the jack to the cables, make sure you don't change the arrangement of the color codes.

Slide the RJ45 jack all the way in like shown in the picture, dont let any cable exposed between the cable jacket and the jack. This is to prevent interference when sending data between computers.


Step 4

Start crimping your cable, insert the jack all the way in to the crimping tool, make sure you insert it well.
Squeeze the tool until you hear a sound, you can be sure you crimp the jack right if all the yellow copper that you can see in the jack are inserted well.

Below I give you pictures to differentiate between the crimped and not crimped RJ45 jack.

 Crimp the cable using crimping tool 

Not crimped RJ45 jack 

 Crimped RJ45 Jack 

End

There you have it, you only need to slide back the boot to the right place and crimp the other end of the cable and you can have the network cable as I show you at the beginning of this article.

Cheers.

Thursday, December 01, 2011

How To Split A Large File Into Several Small Files Using WinRar And HJSplit And How To Merge Them Back

If you ever wanted to upload and share a 350 MB file with your friends using an online file sharing service but you want to upload the file in smaller chunks. How can you split a big file into multiple chunks and upload it to the file sharing service? WinRar and HJSplit are the best applications to not only split big files in to several chunks but also to compress them while splitting.

Method 1: Using WinRar


To start splitting, Right Click on the file that you want to split, choose the option Add to archive. 


WinRar automatically assigns a name for the new archive it is going to create. If you don’t want a default name, you can change it as appropriate.


Under the option Split to volumes, either enter the desired maximum size of each file chunk or choose an appropriate size from the available drop down option. In my case I entered 5 MB for each chunk of file.


Click Ok and wait for few seconds. WinRar compress the source file and splits it in to several files.


Method 2: Using HJSplit


To start splitting the file using HJSplit, Click on the Split tab on the main window.


Now provide HJSplit with your Input (Locate to your file which you want to split) and Output (Locate to where you want your split files to be placed) destinations and enter the desired maximum size of each chunk of file.


Now click the start button and wait for a while till the file splits into smaller chunks.


How To Merge/ Join Files Using HJSplit


With HJSplit you can not only split files, but also join the split parts back together again. To start Joining you files, follow these simple steps.

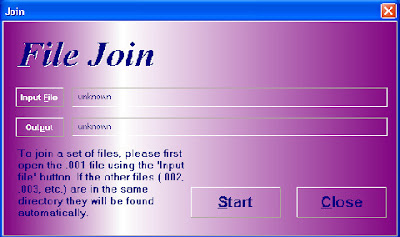
After clicking on the Joinbutton in the main HJSplit screen, you will see the following screen:

  
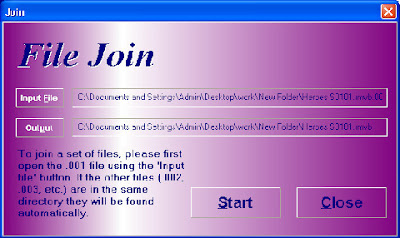
Make sure the set of split parts (set of files ending in .001, .002, .003, etc.) to be joined all reside inside the same directory. Click on the button Input file’, in the screen directly above, which will open the dialog shown directly below:


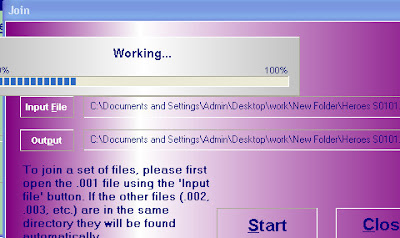
Now press the Start button to merge all the files into one file.


If you think there are some other softwares that can do better job than these, let us know in the comments.